Process Template Editor
GUI orientation
In the following you will learn what the Process Template Editor is, what it does, what it looks like. As the tools’ GUIs are derived from the Eclipse framework, you’ll find similarities if your familiar with it. There are at least five different areas basically, depending on how you count, and we’ll go from left to right and top to bottom.
Explorer
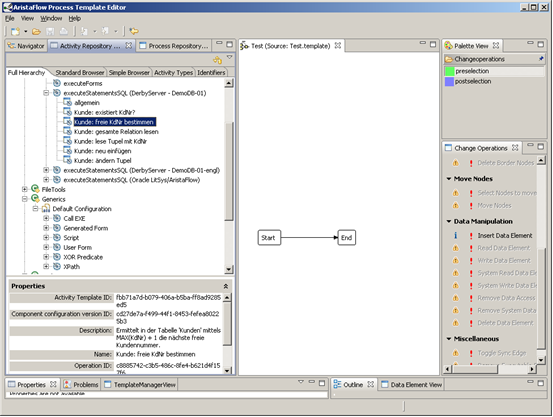
So on the left side you have this column with three different tabs. In the first tab you have your projects / templates. If you want to create a new one, one way is to just right-click somewhere within the column and chose “New” -> “AristaFlow Project”, click on it with the right mouse button, too, and choose “New” -> “AristaFlow Template”. In the next tab you find the Activity Repository Browser, which is not to be confused with the separate tool Activity Repository Editor. The Browser lets you pick an activity template that has been created in the ARE before and drag ’n’ drop it onto a process step. That way applications can be integrated in a plug and play like fashion. Make sure to drill down the menu, so you can access the actual template. The third tab is the Process Repository Browser and shows process templates (and its different versions) stored in the process repository.
Working area
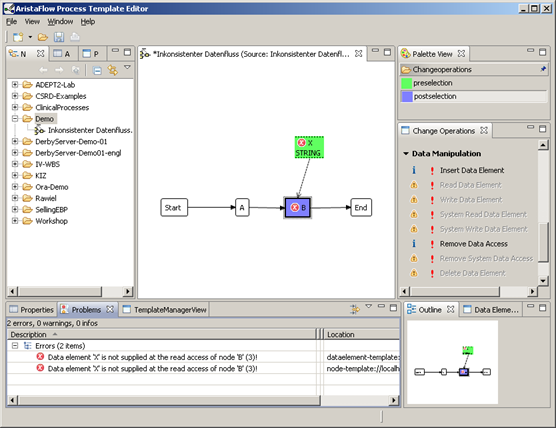
When you open a template or create a new one, it will be shown in the bigger spot in the middle of the window. There will always be at least an start and an end node. As you can see in the little further progressed process graph in the picture below, there is space for the control flow, the data flow and warnings generated by the validation checks in the background. Of course you can have multiple templates opened, resulting in tabs. And if you right-click in the middle area and choose “Display options” you can decide which elements should be shown an which should be hidden for a better overview depending on your context.
Constructs
On the right hand side there is an option to switch the selection mode on the top. More on that in the basic tutorial. Below are the change operations. Notice how some of them are not clickable. That’s because of our Correctness by construction principle. Changes to the graph can only be made if they lead to a compliant graph again. If you ever wonder why the change you intent is currently not allowed you can hover your mouse over the yellow triangles with the exclamation mark and it will be shortly explained in a tool tip.
Testing
When you set up some of your process you might already want to test it. For that there is Button called “Run template” right above the center area, near the menu (not in the picture). But we’ll handle in this later in a tutorial.
Properties
Then on the bottom you can see the horizontal window on the left side with several tabs. In the tab called “Properties” you have a menu on its own on the left side. In the basics you can name your activity for example or assign staff if you clicked on the respective on before. But you will learn about this in more detail in the tutorials. The next tab “Problems” shows warnings and error messages. Just like in programming they can be more or less clear to you. Notice how in this case the background check gives you an error because there is a data element that is read by an activity without being written to before. In the TemplateManager tab you can drag your template to and thereby upload it to the server.
Outline
On the bottom right side you find a window that is dedicated to orient yourself at the process model. In the first tab “Outline” you see a radar or map like overview with the crop of the middle area. The next two tabs have all the nodes and data elements listed, so you don’t have to search for them in the graph. This all of course is especially useful if the process gets very large and complex.